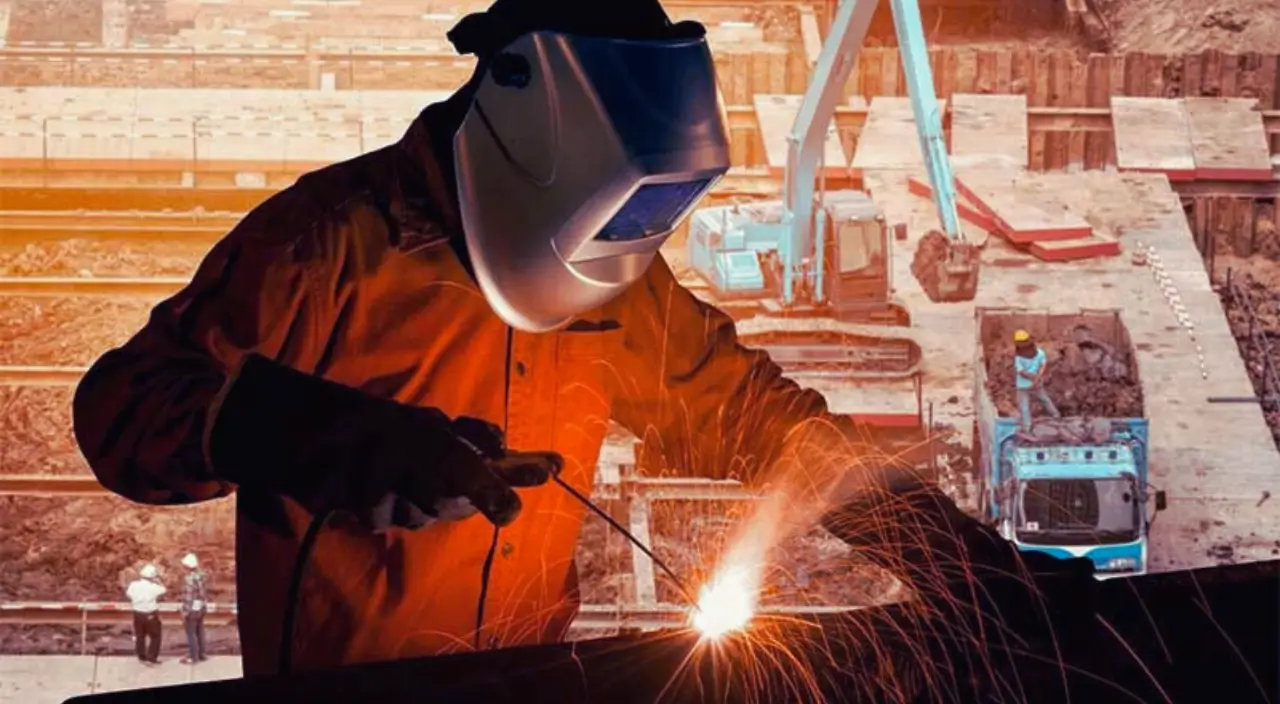

Welding is one of the most essential skills in the field of construction, manufacturing, automotive repair, shipbuilding, and even in small DIY home projects. At its core, welding is the process of joining two or more pieces of metal together by applying heat and sometimes pressure. This process doesn’t just create a joint—it creates a bond that is often stronger than the base material itself. That is why welding is considered a backbone of modern infrastructure. Without welding, we wouldn’t have skyscrapers, bridges, pipelines, automobiles, or even small household tools that we use every day.
When someone searches for HOW TO USE WELDER MACHINE, they are usually beginners who want to start learning the process step by step. But before jumping into the practical side, it’s crucial to understand why welding is so important and why learning this skill can open new doors of opportunity both personally and professionally.
A welding machine is a tool that allows two or more pieces of metal to be joined together permanently by generating the high amount of heat required to melt the metals. Once the melted metals cool, they fuse into one solid piece, forming a strong and durable joint. This makes the welding machine the central element of any welding process, and without it, welding would simply not be possible. Whether it is in construction, automotive repair, shipbuilding, or manufacturing, welding machines play a vital role in building the structures and tools we depend on every day.
The basic concept of a welding machine revolves around converting electrical energy into heat energy. When the machine is turned on, it creates an electric arc between the electrode and the metal workpiece. This arc can reach temperatures as high as several thousand degrees Celsius, enough to melt almost any metal. As the molten parts cool down, they create a permanent bond. Learning the principles of this process is essential before diving into HOW TO USE WELDER MACHINE, because it helps beginners understand why controlling heat, current, and positioning is so important.
Before you start practicing welding, knowing what a welding machine is and how it works gives you the confidence to use it safely and effectively. Many beginners make mistakes simply because they don’t understand the machine’s role in the welding process. Once you know how the machine generates heat, how it transfers energy to the workpiece, and how the metals fuse together, you will have a much easier time mastering the actual techniques of welding. That’s why understanding the basic concept of the machine itself is the foundation of learning HOW TO USE WELDER MACHINE successfully.
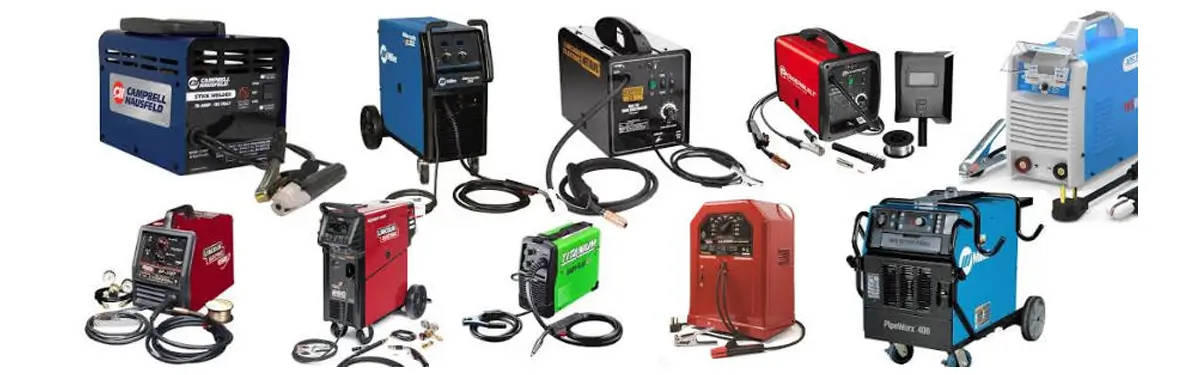
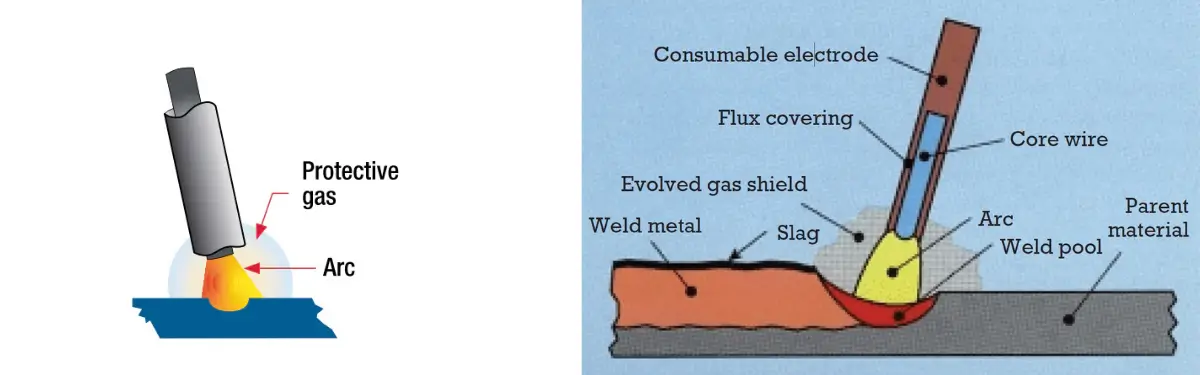
The stick welding machine, also known as an arc welder, is one of the most common and traditional types. It works by creating an electric arc between a coated electrode and the base metal. As the electrode melts, it deposits filler material into the joint, while the coating produces a shielding gas to protect the weld from contamination. This type of machine is widely used in construction, repair, and maintenance because it is affordable, portable, and effective on thick metals. Beginners often start their journey of learning HOW TO USE WELDER MACHINE with stick welders because they are simple yet powerful.
MIG welding machines use a continuous wire electrode fed through a welding gun. At the same time, an inert shielding gas such as argon or carbon dioxide flows around the weld to protect it from oxidation. MIG welders are popular in automotive industries, manufacturing, and home workshops because they are easy to learn, fast, and produce clean welds. If someone is exploring HOW TO USE WELDER MACHINE for smooth and neat results, MIG welding is often the recommended choice.
TIG welding machines are designed for precision work. They use a non-consumable tungsten electrode along with a separate filler rod if needed. This method allows welders to create high-quality, clean, and aesthetically pleasing welds, especially on stainless steel and aluminum. Although TIG welding requires more skill and patience, it is ideal for delicate projects like aerospace components, pipelines, and artistic metalwork. Anyone who wants to advance beyond the basics of HOW TO USE WELDER MACHINE should eventually practice TIG welding to master accuracy and control.
Flux-core welding machines are similar to MIG welders but instead of relying on external shielding gas, they use a special tubular wire filled with flux. When the wire melts, the flux creates a protective shield around the weld. This makes flux-core welding machines suitable for outdoor work where wind might blow away shielding gas. They are often used in heavy equipment repair, structural steelwork, and farm projects. For those learning HOW TO USE WELDER MACHINE in tough environments, flux-core welders are an efficient and versatile option.
Each type of welding machine has its strengths and weaknesses. Stick welders are rugged and affordable, MIG welders are fast and user-friendly, TIG welders are precise but require skill, and flux-core welders are great for outdoor or heavy-duty tasks. The best choice depends on the project, the type of metal, and the skill level of the welder. Understanding these machines not only helps in selecting the right tool but also lays the foundation for effectively learning HOW TO USE WELDER MACHINE in different real-world applications.
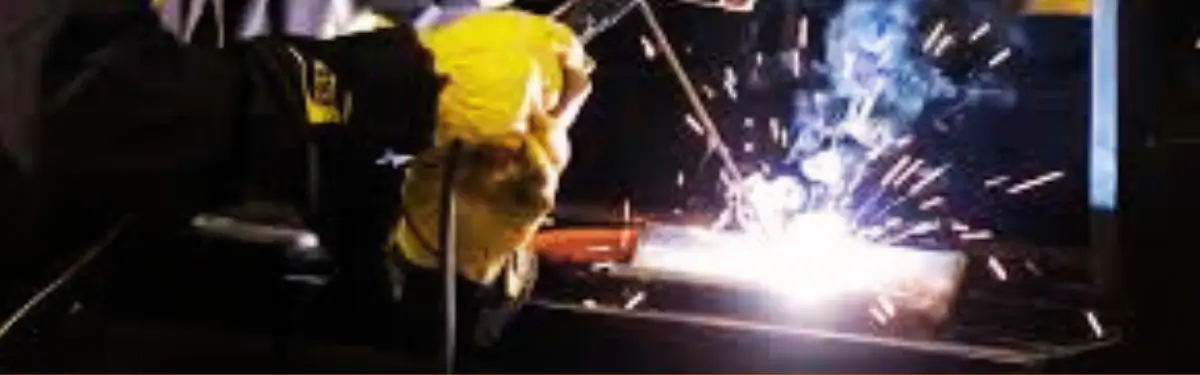
Welding is a powerful process that uses extreme heat, bright light, and sometimes toxic fumes. While it is one of the most valuable skills to learn, it can also be dangerous if proper precautions are not taken. Anyone who wants to learn HOW TO USE WELDER MACHINE must first understand that safety is the foundation of welding. Without protective gear and the right environment, even a small mistake can cause burns, eye injuries, or long-term health problems.
A welder’s first line of defense is proper protective clothing and equipment. A welding helmet with a darkened lens protects the eyes from the blinding arc light and harmful ultraviolet radiation. Flame-resistant gloves and jackets keep the skin safe from sparks and molten metal, while sturdy boots shield the feet. Respirators are also important in certain environments where fumes and gases can be harmful. Simply put, before you even think about striking an arc, you must be dressed for safety.
The environment where welding takes place is just as important as personal protection. A well-ventilated area helps to remove toxic fumes, while a clean, clutter-free workspace reduces the risk of fire hazards. Flammable materials should always be kept away from the welding zone, and a fire extinguisher should be close at hand. Good lighting and stable positioning of materials make the process smoother and safer. Anyone learning HOW TO USE WELDER MACHINE should always make sure their environment supports safe and controlled welding.
Safety in welding is not just about equipment and surroundings—it’s also about habits. Checking cables for damage, ensuring the ground clamp is secure, and double-checking machine settings before starting are practices that prevent accidents. Over time, these habits become second nature and allow welders to focus on their craft with confidence.
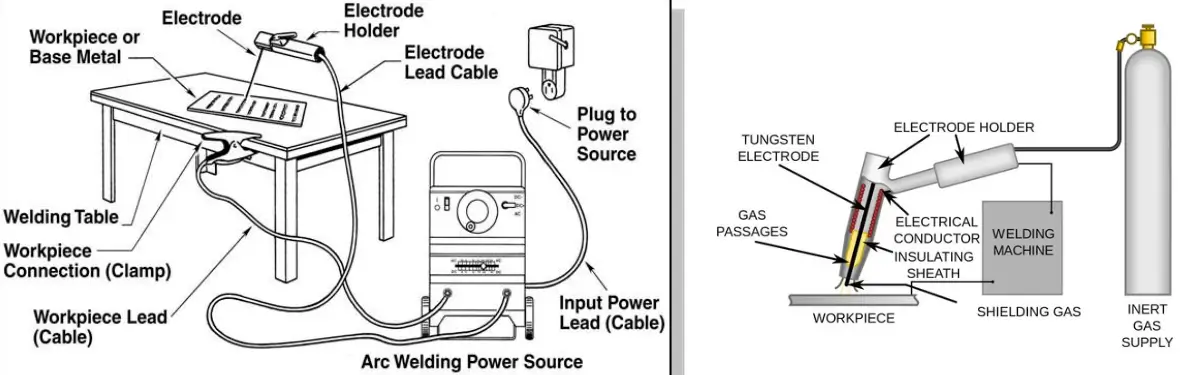
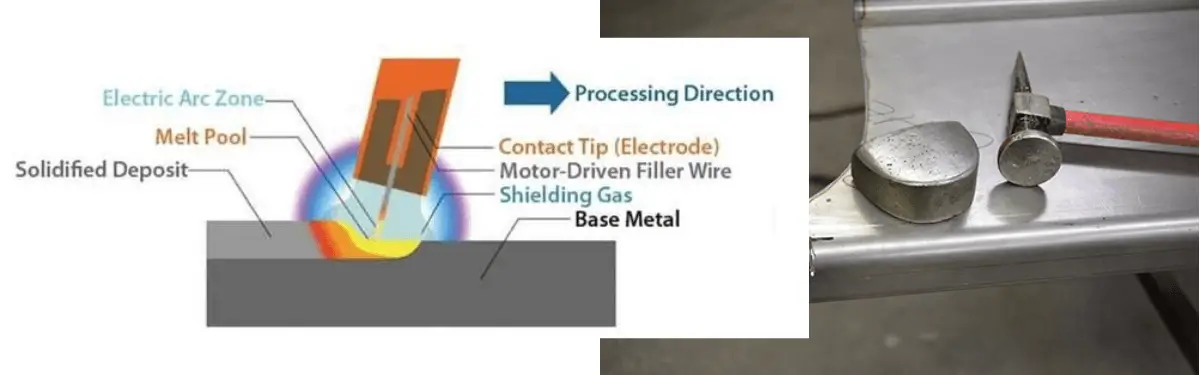
The power source is the heart of a welding machine. It supplies the necessary electrical energy—either alternating current (AC) or direct current (DC)—to create the heat needed for welding. Without understanding how the power source works, it is difficult to master HOW TO USE WELDER MACHINE, because the type of current and voltage directly affects the quality of the weld.
The electrode holder, also known as the stinger in stick welding or the torch in MIG and TIG welding, is the tool that delivers the current to the electrode or wire. It allows the welder to control the arc and guide the welding process. Mastery of the holder or torch is essential for accuracy and efficiency in welding.
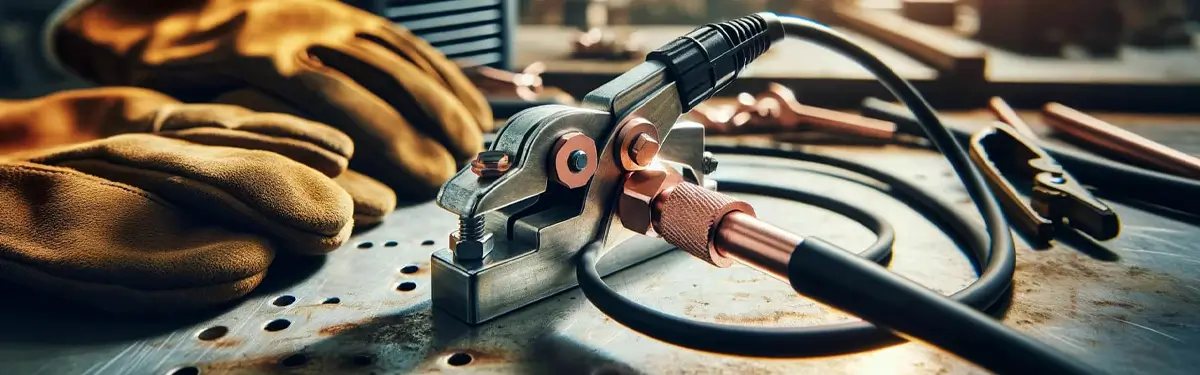
The ground clamp completes the electrical circuit by connecting the workpiece to the welding machine. A secure ground ensures stable current flow, which results in a consistent arc. Without a proper ground, welds can become weak or unstable, making it a critical part to understand when learning HOW TO USE WELDER MACHINE.
Modern welding machines come with a control panel that lets the welder adjust voltage, amperage, and sometimes even wire speed or gas flow. These settings help match the machine to the type of material and thickness being welded. Learning how to fine-tune these controls is a key step in producing high-quality welds.
Welding machines generate extreme heat, not just in the metals being joined but also inside the machine itself. To prevent overheating, many machines use fans, liquid cooling, or special heat sinks. This part ensures the machine remains durable and reliable during long welding sessions.
Heavy-duty cables and connectors carry the current from the power source to the electrode and ground clamp. They may seem like small components, but damaged or loose cables can cause poor welds or even safety hazards. Checking them regularly is part of good welding practice.
Before touching the machine, it’s important to prepare your welding area. The workspace should be clean, dry, and free of flammable materials. Good ventilation is also necessary to remove fumes and gases produced during welding. Having a safe and organized environment ensures that when you begin to set up your machine, the process is smooth and risk-free. This preparation is the foundation of learning HOW TO USE WELDER MACHINE correctly.
Every welding machine requires a stable power source. Depending on the type of machine, it may run on standard household electricity or a higher industrial voltage. Before connecting, make sure your cables are in good condition and the outlet matches the machine’s requirements. A poor or unstable connection can damage both the machine and your weld.
The ground clamp is attached to the workpiece or a metal table connected to the workpiece. This step is essential because it completes the electrical circuit. Without a solid ground connection, the arc will not form properly, and your welds may turn out weak or inconsistent. Understanding the importance of grounding is a crucial part of mastering HOW TO USE WELDER MACHINE.
Different machines use different methods of feeding the filler material. In stick welding, you insert the electrode into the holder. In MIG welding, a spool of wire is loaded into the machine and fed through the torch. In TIG welding, you may use a tungsten electrode with or without a filler rod. Whichever method is used, proper installation ensures steady and smooth welding.
The control panel of the welding machine allows you to set the voltage, amperage, and sometimes wire speed or gas flow. These settings depend on the type of metal and its thickness. For example, thin sheet metal requires lower settings, while thicker steel needs higher power. Learning how to balance these adjustments is an important step in understanding HOW TO USE WELDER MACHINE effectively.
For processes like MIG and TIG welding, shielding gas is necessary to protect the weld from contamination. This involves connecting a gas cylinder, adjusting the regulator, and ensuring proper flow. If the gas flow is too low, the weld will be porous; if it’s too high, it will create turbulence. Correct setup guarantees clean and strong welds.
Before striking the arc, double-check all connections—power, ground, electrode, and gas (if applicable). Make sure your protective gear is on, including helmet, gloves, and flame-resistant clothing. A quick safety inspection prevents accidents and gives you confidence to start welding.

When learning HOW TO USE WELDER MACHINE, one of the most important but often overlooked steps is material preparation. Even if you own the best welding machine in the world, poor preparation will result in weak, messy, or defective welds. Professional welders know that good preparation saves time, reduces errors, and ensures high-quality results.
Material preparation generally involves three essential stages: cleaning, clamping, and positioning. Let’s explore each step in detail.
Before you strike an arc, the first thing you must do is clean the metal surfaces you want to weld. Dirt, rust, oil, paint, or any kind of coating can contaminate the weld and cause weak joints, porosity, and cracking.
✅ Steps for Cleaning:
⚡ Pro Tip: Stainless steel and aluminum require extra care. Aluminum, for example, quickly develops an oxide layer that must be brushed away with a stainless-steel wire brush before welding.
👉 Remember: A clean surface is the foundation of a strong weld. Skipping this step will make all your efforts in HOW TO USE WELDER MACHINE less effective.
Once the metal is clean, the next step is clamping. Welding produces heat, and heat causes metal to expand and warp. Proper clamping keeps your workpieces stable and aligned during welding.
✅ Why Clamping is Important:
✅ Tools for Clamping:
⚡ Pro Tip: Don’t over-tighten clamps, especially on thin metal sheets, as this can leave marks or deform the workpiece.
👉 Proper clamping ensures you can focus on controlling your arc and bead when learning HOW TO USE WELDER MACHINE.
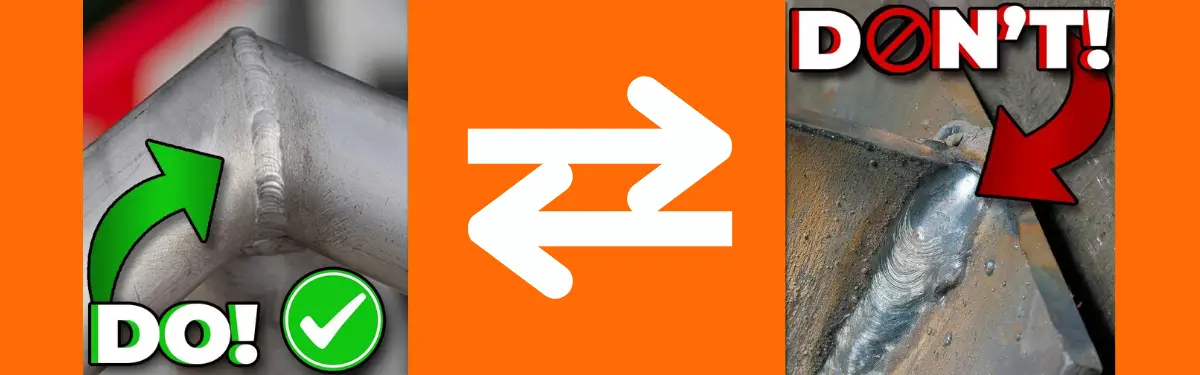
After clamping, the final step is positioning your workpieces. Welding positions play a huge role in weld quality, comfort, and safety.
✅ Key Factors in Positioning:
✅ Common Positioning Methods:
⚡ Pro Tip: Use tack welds (small temporary welds) at the corners before running a full bead. This prevents shifting during welding and helps maintain alignment.
👉 Good positioning makes the welding process smoother and helps you master HOW TO USE WELDER MACHINE with confidence.
If you are just starting to learn HOW TO USE WELDER MACHINE, one of the very first practical skills you’ll need to master is striking an arc. Think of it as the “ignition” of welding—without it, you can’t even begin to create a weld bead. Striking an arc may seem intimidating at first, but with the right technique and practice, it becomes second nature.
There are two common methods for striking an arc: the tapping method and the scratching method. But before exploring these, let’s understand the basics.
An arc is a sustained flow of electricity that jumps between the electrode (or welding torch) and the workpiece. This electric arc generates intense heat (around 6,000°C to 10,000°C), which melts the metal edges and allows them to fuse together.
👉 In short, striking an arc is like creating a controlled spark that transforms into a stable flame for welding.
Before attempting to strike an arc, make sure you’ve completed the preparation steps:
⚡ Pro Tip: Never try striking an arc without proper safety gear, as the arc light can cause arc eye (a painful burn on your eyes) and sparks can injure your skin.
There are two easy ways beginners can strike an arc when learning HOW TO USE WELDER MACHINE:
⚠️ Be careful: If you leave the electrode touching the surface too long, it will “stick” to the workpiece.
⚠️ Be careful: Too much scratching can contaminate the weld surface, so do it lightly.
Striking the arc is just the beginning. The real challenge is keeping it stable.
⚡ Pro Tip: For beginners, try practicing short “arc bursts” (2–3 seconds long) on scrap metal. This builds confidence before moving to longer welds.
Once you can maintain a steady arc, practice moving it smoothly:
👉 Don’t get discouraged—these problems are part of learning HOW TO USE WELDER MACHINE. Every welder has faced them in the beginning.
When learning HOW TO USE WELDER MACHINE, one of the most important skills to develop is the way you move the electrode or welding torch. The movement determines how the molten pool forms, how deep the penetration goes, and how strong and neat the weld bead will look. Beginners often focus only on striking an arc, but true welding mastery comes from controlling the direction and pattern of the weld.
In the push technique, the electrode or torch is angled in the direction of travel, literally pushing the molten pool forward. This creates a flatter, wider bead with less penetration, which is often useful for thin materials or when appearance is more important than depth. The push technique also allows better visibility of the weld pool, making it a beginner-friendly approach for many.
The pull technique is the opposite. Here, the electrode or torch is angled backward, dragging the molten pool behind it. This method increases penetration and produces a stronger joint, especially useful for thicker metals where durability is a priority. While it may reduce visibility of the weld pool slightly, it is often considered the more reliable method for structural work.
The circular motion involves moving the electrode in small circles as you travel along the joint. This helps distribute heat evenly and allows the welder to fill gaps more effectively. It is particularly helpful when working with uneven edges or when welding in horizontal and vertical positions. The circular technique also helps produce a smoother bead appearance, reducing the need for grinding or finishing afterward.
Weaving is one of the most advanced techniques, where the electrode or torch is moved side to side in a weaving pattern. This technique is often used for wider joints and in vertical or overhead welding positions. It allows better control of the weld pool and prevents sagging of molten metal. However, weaving requires practice to maintain consistency in speed and motion, otherwise the bead can look irregular or suffer from lack of fusion.
One of the most crucial skills to master when learning HOW TO USE WELDER MACHINE is understanding how heat and travel speed work together. These two factors largely determine the strength, appearance, and durability of a weld. Even with the right machine and the correct technique, poor control over heat or speed can lead to weak joints, excessive spatter, or even structural failure.
Heat in welding is controlled by the amperage or voltage setting on the welder. Too much heat will burn through the material, create large craters, and lead to excessive warping, especially on thin metals. Too little heat, on the other hand, will cause poor penetration, resulting in a weak weld that sits only on the surface rather than fusing the metals properly. The key is to match the heat level with the thickness of the material and the type of electrode or wire you are using.
Travel speed is equally important. Moving the electrode or torch too quickly prevents the weld pool from bonding fully, leaving narrow, uneven beads that lack strength. Moving too slowly, however, overheats the metal, creating wide, sloppy welds with too much buildup. A consistent, moderate travel speed allows the heat to penetrate evenly and the bead to form smoothly.
Welding is about balance. The correct combination of heat and speed produces a weld bead that has proper penetration, a uniform shape, and minimal spatter. Beginners often struggle to maintain this balance, but practice on scrap metal helps build the muscle memory needed. Watching the weld pool closely is the best way to judge whether the heat and speed are in harmony. A stable, fluid pool that moves steadily along the joint is a clear sign that you are doing it right.
When learning HOW TO USE WELDER MACHINE, one of the biggest challenges is understanding that not all metals behave the same way under heat. Each type of metal has unique properties—such as melting point, thermal conductivity, and surface composition—that affect how it should be welded. The most common metals beginners and professionals work with are mild steel, stainless steel, and aluminum. Mastering these three gives you the foundation to tackle most welding projects with confidence.
Mild steel is often considered the easiest material to weld, making it the go-to choice for beginners. It is forgiving because it does not require extremely precise heat settings, and it responds well to most common welding processes like Stick, MIG, and Flux-core. When welding mild steel, it is important to clean the surface of rust, paint, and oil, as these can cause porosity in the weld. The metal tolerates higher heat compared to aluminum, so penetration is usually not a problem. The main focus should be on maintaining a steady arc and consistent speed to create strong, smooth weld beads.
Stainless steel, though similar in appearance to mild steel, requires more control and attention. It conducts heat poorly, which means it retains heat longer and can easily warp or discolor if too much heat is applied. Proper control of amperage and travel speed is essential. Because stainless steel is often used in food, medical, and decorative industries, appearance matters as much as strength. This means welders must ensure clean, neat beads with minimal spatter. Shielding gas protection is also crucial in processes like MIG and TIG welding, as stainless steel is prone to contamination. Learning HOW TO USE WELDER MACHINE effectively includes understanding how to balance heat input and gas coverage when working with stainless steel.
Aluminum presents the greatest challenge among the three. It has a low melting point but high thermal conductivity, which means it heats up quickly and spreads the heat across the material. This often leads to burn-through if the welder is not careful. Aluminum also develops a thin oxide layer that must be cleaned thoroughly before welding, as the oxide melts at a much higher temperature than the base metal. TIG welding is often the preferred method for aluminum, as it allows precise control of heat and provides cleaner welds. Patience, practice, and constant observation of the weld pool are necessary when working with aluminum. Beginners often find it difficult, but once mastered, it opens up opportunities in industries like automotive, aerospace, and construction.
Learning HOW TO USE WELDER MACHINE is exciting, but it can also be frustrating when the results don’t turn out as expected. Almost every beginner faces similar challenges in the early stages, and these mistakes can often discourage them from continuing. The good news is that these errors are not only common but also easily fixable with the right knowledge and practice.
One of the first mistakes beginners make is ignoring the importance of preparation. Welding on dirty, rusty, or oily metal often results in weak joints and porous welds. Many new welders rush straight to striking an arc without taking time to clean and clamp their workpieces properly. Skipping these steps may save a few minutes, but it almost always leads to poor results and wasted effort. Proper surface cleaning and secure positioning should always be part of the process.
Another frequent error comes from incorrect welder settings. Beginners often set the amperage too high or too low without considering the thickness of the material or the electrode type. Too much heat burns holes through the metal, while too little prevents proper penetration. Understanding how to match machine settings with the task at hand is essential when practicing HOW TO USE WELDER MACHINE effectively.
Maintaining the right arc length is also a challenge for new welders. Holding the electrode too close causes it to stick, while keeping it too far creates spatter and weak beads. Beginners sometimes move their hands too quickly out of fear of overheating the material, which leaves narrow, incomplete welds. Slow, steady movements and practice with arc stability help overcome this issue.
Uneven travel speed is another mistake that affects weld quality. Moving too fast results in shallow welds, while moving too slowly creates wide, bulky beads that lack proper fusion. Consistency is key. It often helps to rest the wrist or forearm on a stable surface to maintain better control during the weld.
Perhaps the most dangerous mistake is neglecting safety precautions. Some beginners weld without proper protective clothing, gloves, or helmets, exposing themselves to burns, sparks, and harmful UV radiation. Safety should never be an afterthought—it is part of the welding process itself. Knowing HOW TO USE WELDER MACHINE responsibly means respecting the risks involved and protecting yourself at all times.
As you progress in learning HOW TO USE WELDER MACHINE, you will discover that welding is not always done in the most comfortable or convenient positions. Real-world projects often require you to weld on different angles and surfaces, and this is where welding positions come into play. Each position demands a slightly different technique, and understanding them will help you achieve stronger, cleaner, and more professional welds.
The flat position is the easiest and most common starting point for beginners. In this position, the workpiece is placed on a flat surface, and gravity naturally pulls the molten metal into the joint. It allows for better visibility of the weld pool and makes it easier to control speed, arc length, and bead shape. Because of its simplicity, the flat position is often used for practice sessions to build confidence and develop the basic rhythm of welding.
The horizontal position introduces a new challenge. The weld is applied along a horizontal axis, but gravity causes the molten metal to sag downward. To maintain a neat bead, you must carefully balance travel speed and arc control. A slightly faster movement and correct electrode angle help prevent the weld from becoming uneven or drooping. Mastering this position is essential for many fabrication tasks where joints are aligned side to side rather than flat on a table.
The vertical position is more demanding, as the weld runs up or down a vertical surface. Here, gravity pulls directly against the molten pool, making it more difficult to control. Two approaches are commonly used: welding from bottom to top for stronger penetration or from top to bottom for faster work on thin materials. This position requires steady hands and precise heat management to prevent the molten metal from dripping or creating excessive buildup. Learning vertical welding takes practice, but it is an important step in advancing welding skills.
The overhead position is considered the most challenging of all. The workpiece is positioned above the welder’s head, and molten metal naturally tries to fall downward. To succeed, you must use the correct heat settings, maintain a tight arc, and move steadily without hesitation. Protective gear becomes even more critical here, as sparks and spatter fall directly toward the welder. While difficult, overhead welding is necessary in construction, repair, and industrial work where accessibility is limited.
Keeping your welding machine clean is one of the easiest ways to extend its life. Dust, dirt, and metal particles can build up inside, leading to overheating and performance issues. After every use, wipe the exterior and use compressed air to clear internal dust. Just as learning HOW TO USE WELDER MACHINE ensures smooth operation, cleaning it regularly prevents hidden damage.
Damaged or loose cables can weaken your arc and cause inconsistent welds. Check the electrode holder, ground clamp, and power cord often to make sure they are secure and in good condition. Replacing worn parts on time helps maintain strong performance and prevents accidents.
Where you keep your welder matters. Store it in a dry, dust-free, and cool place to protect it from moisture and extreme heat. Proper storage keeps the machine’s circuits safe and ensures it works whenever you need it.
Overheating is one of the main reasons welders break down early. Always keep the ventilation grills clean and unblocked so airflow stays smooth. If your machine has a cooling fan, check that it’s working properly to prevent damage from heat.
Every welder has a limit, known as the duty cycle. Exceeding it can overwork the machine and damage internal parts. Follow the manufacturer’s recommendations to keep the welder running efficiently for years. Knowing HOW TO USE WELDER MACHINE also means knowing when to give it rest.

—A. Welding is the process of joining two or more pieces of metal together using heat, pressure, or both. The result is a strong, permanent bond that is often stronger than the original metal. Anyone searching for HOW TO USE WELDER MACHINE is essentially trying to learn the basics of this process.
—A. The main types include MIG (Metal Inert Gas), TIG (Tungsten Inert Gas), Stick (Shielded Metal Arc), and Flux-Core welding. Each type has different uses—MIG is beginner-friendly, TIG is precise, Stick is versatile, and Flux-Core works well outdoors.
—A. Welding takes practice, but it’s not impossible. Beginners can start with Stick or MIG welding, which are easier to handle. The more you practice HOW TO USE WELDER MACHINE, the faster your skills will improve.
—A. Essential safety gear includes a welding helmet with the correct shade, gloves, protective clothing, and safety boots. Since welding produces high heat, UV radiation, and sparks, protection is crucial.
—A. Yes, but only if you have the right setup. You’ll need proper ventilation, safety equipment, and the correct welder for your project. Many people who learn HOW TO USE WELDER MACHINE begin by practicing small projects at home.
—A. Common weldable metals include mild steel, stainless steel, and aluminum. However, each metal requires different settings, filler materials, and techniques. For example, aluminum is best welded with TIG, while mild steel works well with MIG or Stick.
—A. The duty cycle refers to how long a welding machine can operate continuously before needing rest. For example, a 60% duty cycle at 200 amps means you can weld for 6 minutes out of 10, then let the machine cool for 4 minutes. Knowing this is part of mastering HOW TO USE WELDER MACHINE effectively.
—A. Yes, without proper precautions. Risks include burns, electric shock, eye damage, and breathing in harmful fumes. This is why wearing protective gear and working in a safe environment is non-negotiable.
—A. Some processes, like MIG and TIG, require shielding gas to protect the weld from contamination. Others, like Stick and Flux-Core, use flux-coated electrodes or flux-filled wire, eliminating the need for external gas.
—A. Start by choosing the right type of welder, learning safety rules, and practicing on scrap metal. Reading guides like HOW TO USE WELDER MACHINE tutorials and watching professionals can accelerate your learning.
Learning HOW TO USE WELDER MACHINE is the foundation for becoming a confident welder. Once you understand how to set it up, strike an arc, and control the heat, you open the door to endless possibilities in construction, repair, and even creative metalwork.
Welding is not only about technique but also about safety and care. By maintaining your welder, respecting its limits, and practicing regularly, you ensure both quality results and long machine life. With patience and dedication, mastering welding becomes a skill that can shape your career and personal projects for years to come.
Read More:


At Best Welder Reviews, Hamim Minhas has years of welding experience and expertise in evaluating welding tools and accessories. My goal is to provide clear, reliable and deep insights to help welders of all levels make informed decisions. Whether you're a beginner or an expert, my thorough reviews, buying guides, and tips ensure you find the right tool for every welding project.