Choosing your first welder is one of the most exciting steps in a new welding journey. Whether you are looking to learn welding for hobby projects, repair work, fabrication, or as a professional career path, the decision you make when buying your first welder will have a lasting impact on your skills, efficiency, and safety. Welding is not just about melting two pieces of metal together—it is about understanding materials, electricity, safety, and the different processes that allow you to create strong, durable, and precise joints. Many beginners underestimate the importance of starting with the right welder for their needs, but your first welder can either accelerate your learning curve or cause unnecessary frustration if chosen poorly. The goal of this guide is to walk you through every detail you need to know, from understanding different welding methods to evaluating the technical specifications of a machine, so you can confidently select the best first welder for your skill level, budget, and future goals.
Before committing to your first welder purchase, it is essential to develop a foundational understanding of welding. Welding is the process of joining materials—usually metals or thermoplastics—by applying high heat to melt the base material and, often, a filler material. The melted parts cool and fuse together, forming a strong joint. While the concept may sound simple, the execution requires skill, control, and the right equipment. Your first welder will introduce you to this balance of art and science, and knowing the basic terms and principles will make the buying process much easier. For example, terms like amperage, duty cycle, polarity, and voltage are not just technical jargon—they directly influence the type of work you can do and the materials you can handle. As a beginner, understanding these terms ensures that you can read product specifications with confidence and avoid purchasing a welder that is either too weak for your needs or unnecessarily complex for your current skill level.
Many beginners make the mistake of buying the cheapest welder they can find or, conversely, investing in an overly advanced industrial model with features they will not use for years. Both approaches can slow your progress. The right first welder will match your intended applications, be easy to operate, and offer enough flexibility to grow with you as your skills improve. For example, if you are primarily interested in automotive repair, a MIG welder with flux-core capability might be your best option. If you want to work on artistic metal sculptures, a TIG welder could give you the precision you need. Choosing the right first welder also means thinking about portability, power requirements, and available accessories. An informed purchase will save you money in the long run because you will avoid the need for an immediate upgrade or the frustration of dealing with a machine that does not meet your expectations.
When selecting your first welder, it is crucial to understand the main types of welding processes and which might be the best fit for you. MIG welding, also known as Gas Metal Arc Welding (GMAW), uses a continuous wire feed and is generally considered the easiest method for beginners to learn. It offers speed, versatility, and the ability to weld thin or thick materials with minimal cleanup. TIG welding, or Gas Tungsten Arc Welding (GTAW), provides precise control over the weld and produces clean, high-quality joints but requires more practice and steady hand coordination. Stick welding, or Shielded Metal Arc Welding (SMAW), is robust, cost-effective, and works well outdoors, even in windy conditions, but it produces more spatter and requires more cleanup. Flux-cored arc welding (FCAW) is similar to MIG but uses a tubular wire filled with flux, allowing welding without shielding gas. Understanding these processes will help you decide which type of first welder suits your projects, environment, and budget.
One of the first technical factors to consider when buying your first welder is power input. Welders are typically rated for either 110/120V or 220/240V, with some models offering dual-voltage capability. For most beginners working at home or in a small garage, a 110V welder is convenient because it can plug into a standard household outlet. However, these welders may be limited in terms of maximum amperage, making them less suitable for thick materials. A 220V welder requires a special outlet and can handle heavier work, but it is less portable and may require electrical upgrades to your workspace. If your budget allows, a dual-voltage first welder can offer the best of both worlds, providing flexibility for small and large projects alike. It is also important to consider the duty cycle, which indicates how long you can weld continuously before the machine needs to cool down. A longer duty cycle is beneficial for bigger projects, but beginners can often work comfortably with a shorter one.
When selecting your first welder, amperage is one of the most important specifications to understand because it directly determines the maximum thickness of material you can weld. Amperage refers to the electrical current used in the welding process, and different metals and thicknesses require different amperage levels for proper fusion. As a beginner, you may start with mild steel, which is more forgiving and welds well with lower amperage. For example, welding thin sheet metal may require only 30 to 50 amps, while thicker structural steel could require 150 amps or more. Choosing a first welder with adjustable amperage settings ensures you can fine-tune the heat output for various projects. If you buy a machine with limited amperage, you may quickly find yourself unable to tackle heavier jobs, while a machine with unnecessarily high amperage could be overkill for light projects and more expensive. Understanding the relationship between amperage and material thickness will help you select a versatile first welder that meets both your immediate and future needs.

Duty cycle is a term that may confuse many first-time buyers, but it is essential when evaluating your first welder. This specification is expressed as a percentage and tells you how long you can operate the welder at a specific output before it must cool down. For example, a 20% duty cycle at 90 amps means you can weld continuously for two minutes out of a ten-minute period, after which the machine needs to rest to prevent overheating. Beginners often think a short duty cycle will not affect them, but it can become frustrating during larger projects when you are forced to pause frequently. Higher duty cycles are generally more expensive, but they can significantly improve productivity. However, for most small home projects, a lower duty cycle is acceptable and can even be beneficial, giving you short breaks to inspect your work, adjust settings, and maintain safety awareness.
Portability is another factor worth considering when buying your first welder. As a beginner, you may not have a dedicated workshop space, meaning you might need to move your welder between storage and your work area or transport it to different job sites. Compact, lightweight welders are easier to carry and store, while larger industrial machines offer more power but are harder to move. Some modern inverter-based welders combine high performance with portability, making them an excellent choice for beginners who value both mobility and capability. When assessing portability, consider not only the weight of the machine but also its shape, built-in handles, and whether a carrying case or cart is included. If you anticipate welding in various locations, a portable first welder will make your learning process far more convenient and enjoyable.
Your first welder is an investment, and build quality plays a huge role in how long it will last. While budget constraints are common for beginners, choosing a machine made with robust materials, quality components, and a reliable cooling system will prevent costly repairs or replacements later. Welders built with durable housings, sturdy wire feeders, and reliable internal electronics are less likely to fail during operation. Additionally, well-constructed machines maintain consistent performance, which is crucial for learning proper technique. A poorly built welder can produce erratic arcs or inconsistent heat, making it harder for you to improve your skills. Reading customer reviews, checking manufacturer warranties, and looking for established brands with a reputation for durability are practical steps to ensure your first welder will serve you for years.
Safety should always be a priority when purchasing your first welder. Welding involves high temperatures, intense light, and potentially hazardous fumes, so a good machine should include built-in safety features. Thermal overload protection is a common safeguard that shuts down the machine if it overheats, preventing damage to both the equipment and the user. Voltage fluctuation control can protect the welder’s electronics and maintain a stable arc, even if your power supply is inconsistent. Some beginner-friendly models also have automatic hot start and anti-stick functions, which make it easier to strike and maintain an arc without sticking the electrode to the workpiece. While you should always use proper protective gear, a welder with solid safety features gives you an additional layer of security as you build your skills.
When deciding on your first welder, one of the choices you’ll face is whether to go with a gas-shielded process or a gasless option. Gas-shielded welding, such as MIG with solid wire, uses an external shielding gas—often a mixture of argon and carbon dioxide—to protect the molten weld pool from atmospheric contamination. This produces cleaner, more precise welds with minimal spatter, making it ideal for indoor projects and work on thinner metals. However, it requires purchasing or renting a gas cylinder, regulating gas flow, and storing the cylinder safely. Gasless welding, often in the form of flux-cored arc welding, does not require an external gas cylinder because the wire is filled with flux that creates its own shielding as it burns. This method is more portable, less affected by wind, and suitable for outdoor work, but it tends to produce more spatter and requires additional cleanup. For your first welder, the choice between gas and gasless will depend on your budget, workspace, and the types of projects you plan to tackle.
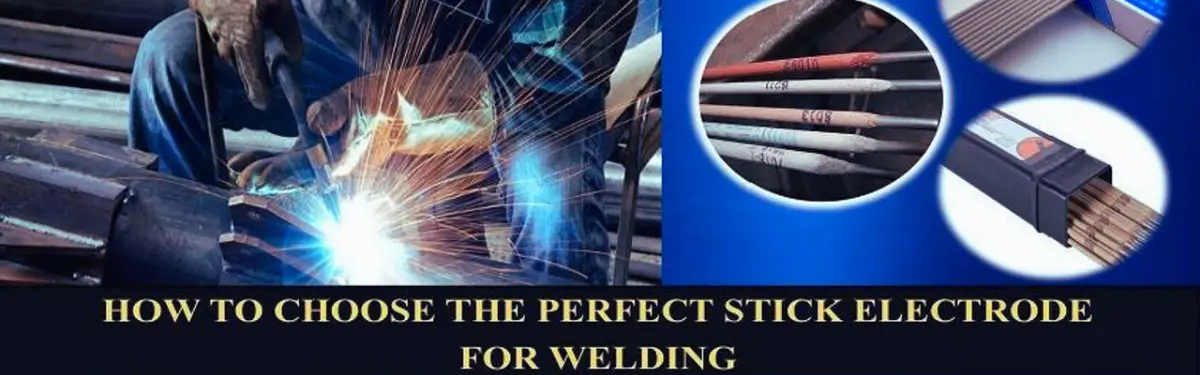
The consumables you use—whether electrodes for stick welding or wire for MIG—are just as important as the machine itself. Beginners often underestimate how much electrode or wire choice impacts weld quality. For stick welding, electrodes come in various classifications, such as E6010, E6013, and E7018, each with different properties for penetration, tensile strength, and slag removal. E6013 is often recommended for beginners because it is forgiving and produces smooth, easy-to-manage welds on thinner materials. In MIG welding, solid wire like ER70S-6 works well with shielding gas, while flux-cored wire like E71T-GS is suited for gasless setups. Wire thickness is also critical; thinner wires allow for more precise welding on lighter materials, while thicker wires deliver more heat for heavier sections. Understanding how to choose the right electrode or wire for your first welder will ensure better results and help you learn proper technique from the start.
A well-organized and safe workspace is vital when starting out with your first welder. Even if you are working from a small garage or outdoor shed, taking time to set up your area properly will improve both safety and efficiency. The space should be clean, free of flammable materials, and well-ventilated to disperse welding fumes. Good lighting will help you see the weld area clearly, and a sturdy workbench with a metal top or fire-resistant surface will provide a stable base for your projects. If you are working indoors, installing a welding curtain or shield can protect others nearby from harmful UV light. Proper cable management is also essential to avoid tripping hazards. Having a dedicated area for your first welder not only makes it easier to focus on technique but also extends the life of your equipment by keeping it away from dust, moisture, and accidental damage.
No matter how advanced your first welder is, it cannot protect you from the hazards of welding—you need proper personal protective equipment (PPE). At the very least, you will need a quality auto-darkening welding helmet that adjusts quickly to changing light levels, protecting your eyes from the intense arc while allowing you to see your workpiece clearly. Welding gloves made from heat-resistant leather will protect your hands from sparks and heat, while a flame-resistant jacket or sleeves will shield your arms and torso. Safety glasses should be worn under the helmet to guard against flying debris when grinding or chipping slag. Sturdy work boots, preferably with steel toes, protect your feet, and ear protection helps when working in noisy environments. Investing in proper PPE from the start ensures that you can focus on developing your skills without worrying about preventable injuries.
Before you turn on your first welder and start laying beads, it is worth taking time to learn basic welding principles through research, tutorials, or a beginner welding class. Understanding concepts like travel speed, electrode angle, and arc length will give you a solid foundation before you practice. You can even simulate motions with an unplugged machine or without striking an arc to build muscle memory. This preparation will make your first welding attempts less intimidating and reduce wasted materials. Reading your welder’s manual thoroughly is also critical—it contains machine-specific guidance on setup, safety, and troubleshooting. By mastering the theory and setup steps before your first weld, you will approach the task with more confidence and achieve better results.
Starting out with your first welder is an exciting experience, but it’s natural to make mistakes along the way. Being aware of common beginner pitfalls can save you time, materials, and frustration. One frequent error is using incorrect settings, such as too high or too low amperage, which can result in poor penetration or excessive spatter. Beginners often hold the electrode at the wrong angle or too far from the workpiece, causing an unstable arc. Another common issue is neglecting to clean the metal before welding, leading to contaminated welds that are weak or full of slag. Not maintaining proper travel speed can also cause defects like burn-through or undercut. Additionally, ignoring safety precautions or skipping proper PPE use puts you at risk of serious injuries. Recognizing these mistakes early and learning how to avoid them will help you get the most out of your first welder and accelerate your skill development.
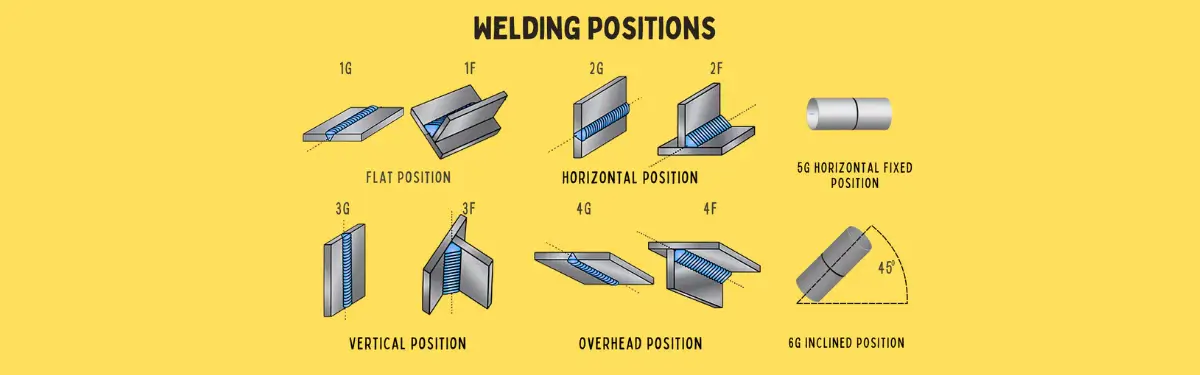
Welding positions refer to the orientation in which you weld the metal. There are four standard positions: flat, horizontal, vertical, and overhead. Each position requires different techniques and skills, so understanding them is essential for a beginner. The flat position is the easiest and most stable, where the weld is performed on the top surface of a horizontal workpiece. Horizontal welding requires more control to prevent the molten metal from sagging or dripping. Vertical welding can be done with the weld progressing upwards or downwards, and it demands steady hand movement to avoid defects. Overhead welding is the most challenging, as gravity pulls molten metal downward, increasing the risk of poor welds. Beginners usually start practicing in the flat position to build confidence before progressing to more difficult angles. Mastering all welding positions with your first welder opens up a wide range of projects and applications.
Proper metal preparation is often overlooked by beginners but is critical for successful welds. The goal is to remove dirt, rust, paint, oil, and other contaminants that interfere with the welding process. Dirty metal causes poor arc stability and results in weak, porous welds. Using a wire brush, grinder, or chemical cleaner to prepare the metal surface ensures better electrical contact and stronger fusion. Additionally, edges and corners may need to be beveled or shaped for thick materials to allow full penetration of the weld. In some cases, clamping or tack welding parts into position before fully welding helps maintain alignment and reduce distortion. Taking time to prepare your materials properly before using your first welder not only improves weld quality but also reduces rework and frustration.
Once you have your first welder and have learned the basics, starting with simple practice projects is the best way to build confidence. Beginners often begin by welding flat beads on scrap metal to master travel speed, arc length, and electrode angle. As skills improve, moving on to butt joints, lap joints, and fillet welds on clean steel plates develops technique in common weld types. Small projects like making a metal toolbox, welding a frame, or building a simple garden gate can provide practical experience while producing useful items. The key is to practice consistently, analyze your welds critically, and learn from mistakes. Over time, your first welder will become a trusted tool, and complex projects will seem more achievable. Documenting your progress with photos or notes can help track improvements and keep motivation high.
Proper maintenance of your first welder ensures its longevity and consistent performance. After each welding session, inspect cables, connectors, and consumables for wear or damage and replace them if necessary. Keeping your machine clean from dust, metal debris, and moisture prevents internal component failure. Checking and cleaning the wire feed system or electrode holder regularly reduces feeding issues and improves arc stability. For gas-shielded welders, monitoring gas flow and tank pressure is essential. Periodically tightening all screws and bolts keeps the welder mechanically sound. Following the manufacturer’s recommended maintenance schedule, including any software updates for digital machines, will protect your investment and allow you to focus on developing your welding skills rather than troubleshooting machine problems.
As you gain confidence and control with your first welder, exploring advanced welding techniques can help refine your skills and expand your capabilities. Techniques such as weaving, stringer beads, and pulse welding each serve different purposes and require varying levels of skill. Weaving involves moving the electrode side to side to cover a wider area and produce a stronger weld, useful for thicker materials. Stringer beads are straight, narrow welds that focus heat in a precise area, offering deeper penetration and a cleaner finish. Pulse welding modulates the current in pulses, allowing for better heat control and reduced warping, ideal for thin metals. Learning these techniques early prepares you for more complex projects and gives you an edge in quality and efficiency. With practice, these skills become second nature and open doors to professional-level work with your first welder.
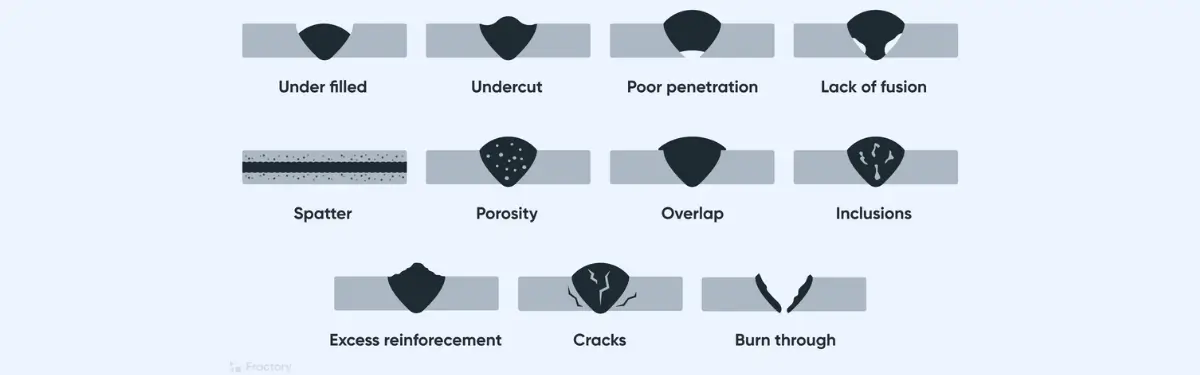
Weld defects can be frustrating for beginners, but understanding their causes and how to fix them is crucial. Porosity, small holes or voids in the weld, is often caused by contaminants, moisture, or improper shielding gas coverage. Cracks may form due to incorrect cooling rates or welding on dirty metal. Undercut happens when too much metal is melted away along the weld edge, weakening the joint. Excessive spatter, where molten droplets scatter, can result from incorrect amperage or voltage settings. Insufficient penetration means the weld does not fuse deeply enough, reducing strength. By carefully inspecting your welds and adjusting settings, electrode angle, and travel speed, you can troubleshoot these issues. Keeping your welding area clean and using the correct consumables also helps minimize defects. Your first welder’s manual and online tutorials are valuable resources for learning defect diagnosis and prevention.
Beyond the welder itself, accessories play a key role in your welding success. A welding cart or stand provides mobility and organization for your machine and consumables. Clamps and magnets help hold workpieces securely in place during welding, improving accuracy and safety. A wire brush, chipping hammer, and grinder allow you to clean slag and prepare surfaces effectively. Spare electrodes, welding wire, and contact tips ensure you don’t run out of consumables mid-project. Protective gear such as welding curtains and fire-resistant blankets add layers of safety to your workspace. Having the right accessories organized and ready enhances your workflow and minimizes downtime. When buying your first welder, consider budget for these extras, as they complement the machine and help you develop professional habits.
As a beginner, it’s beneficial to have a basic awareness of welding codes and standards that govern the quality and safety of welded joints. Organizations such as the American Welding Society (AWS), American Society of Mechanical Engineers (ASME), and International Organization for Standardization (ISO) publish guidelines covering everything from welder qualification to weld inspection. While you may not need to master these codes at first, familiarity with terms like weld symbols, joint types, and inspection methods prepares you for professional environments. Adhering to standards ensures your welds meet minimum strength and safety requirements, especially important for structural or critical applications. Learning about these codes also guides your practice, encouraging good techniques and documentation. Many beginner courses introduce these concepts, which complement hands-on experience with your first welder.
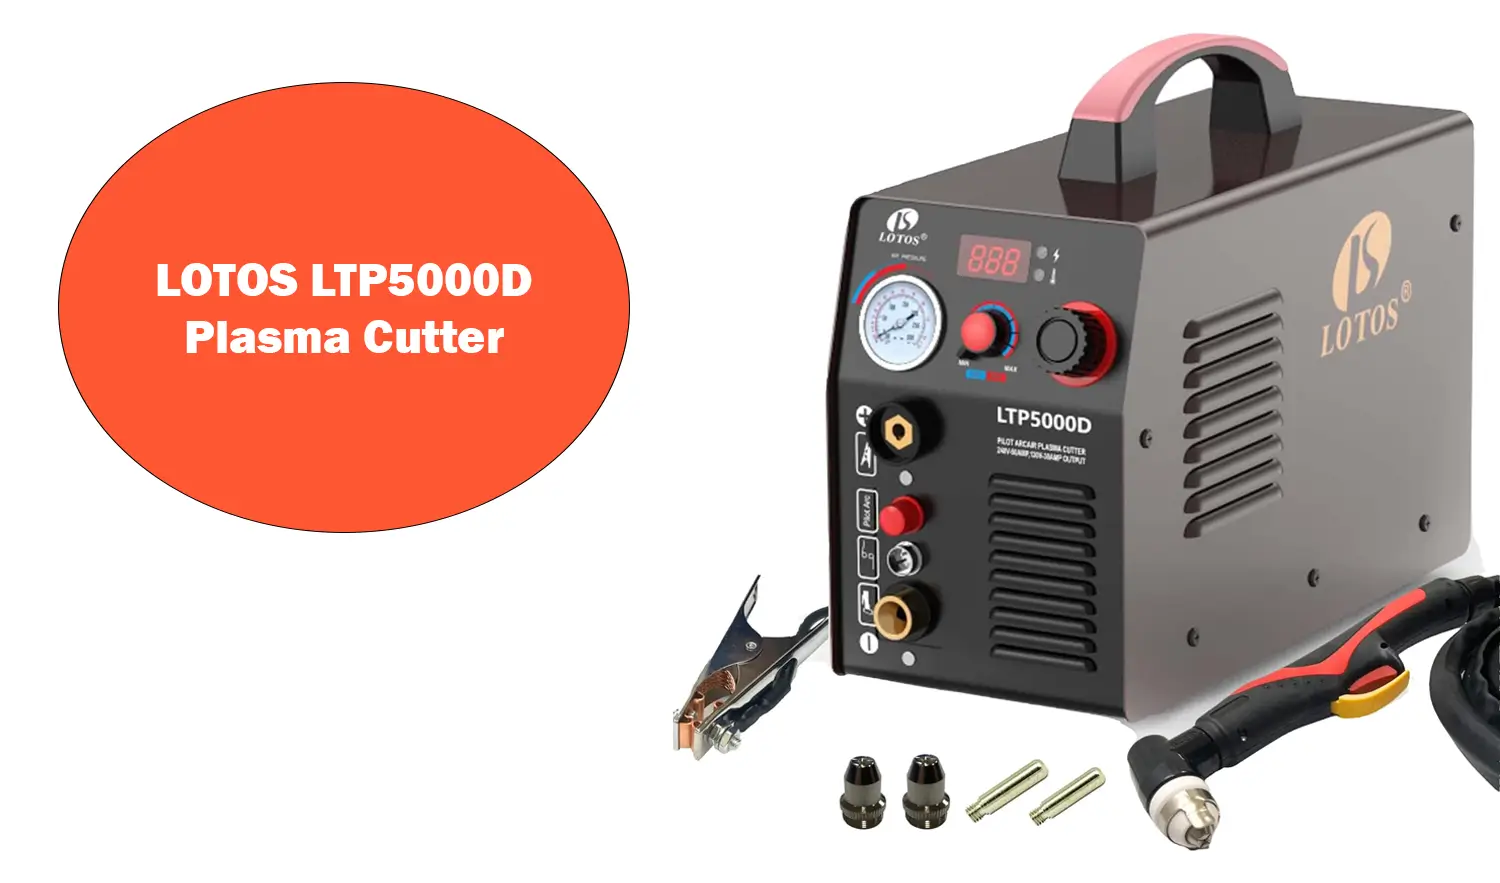
Once you’ve mastered the basics with your first welder, thinking about future projects helps keep your welding journey exciting and goal-oriented. Maybe you want to build a custom motorcycle frame, restore vintage cars, or create metal artwork. Each new project introduces unique challenges such as different metals, thicknesses, or joint designs that may require upgrading your equipment or expanding your skills. Planning ahead allows you to save for additional machines, like a TIG welder for precision work or a plasma cutter for metal shaping. It also encourages continuous learning through advanced classes, certifications, or joining welding communities. Keeping your first welder well maintained while exploring new techniques and tools will deepen your enjoyment and help you achieve professional-level craftsmanship.
Understanding the basics of welding metallurgy is a valuable step for beginners aiming to improve the quality and durability of their welds. Metallurgy refers to the science of metals—their structure, properties, and behavior when heated or cooled. When welding, the intense heat alters the metal’s microstructure in the heat-affected zone (HAZ), which can affect strength, toughness, and corrosion resistance. Different metals, such as mild steel, stainless steel, and aluminum, react differently to heat and require specific welding techniques. For instance, aluminum conducts heat rapidly and forms an oxide layer that must be cleaned before welding. Being aware of how welding affects metal properties helps you select appropriate settings on your first welder and avoid defects like cracking or warping. Over time, this knowledge supports better joint design, filler material choice, and post-weld treatments to achieve strong, lasting bonds.
Managing heat input is critical in welding, especially for beginners working with thinner metals or alloys sensitive to heat. Excessive heat can cause warping, burn-through, or reduced mechanical properties, while insufficient heat results in weak joints. Techniques to control heat include adjusting amperage and voltage settings appropriately for the material and thickness. Using pulse welding modes or intermittent welding (stitch welding) allows the metal to cool periodically, reducing distortion. Preheating thicker metals before welding can improve penetration and reduce cracking risk. Additionally, controlling travel speed and electrode angle impacts heat distribution. Practicing these heat control methods with your first welder ensures cleaner, stronger welds and prolongs the life of both your equipment and your workpieces.
Starting your welding journey with manageable, practical projects boosts both skills and confidence. Simple projects like making a metal picture frame, a garden trellis, or a small welding table are excellent for practicing straight beads, butt joints, and corner welds. Building a metal toolbox or a fire pit helps you learn basic fabrication, cutting, and finishing techniques. As you gain proficiency, consider projects such as welding bicycle frames, building shelving units, or repairing farm equipment. These projects introduce different welding positions, material thicknesses, and joint types that broaden your experience. Tackling beginner-friendly projects with your first welder creates a sense of accomplishment and provides useful items, motivating continued practice and skill development.
Welding is a skill that demands consistent practice and patience. Your first welder is a tool, but mastery comes from hours spent developing hand-eye coordination, timing, and an understanding of materials. Early welds may be imperfect, but analyzing mistakes and adjusting technique will lead to rapid improvement. Patience prevents rushing, which can cause defects or safety oversights. Setting realistic goals, such as practicing a few minutes each day, and gradually increasing complexity helps build muscle memory and confidence. Joining local welding clubs or online forums can provide support, feedback, and inspiration. Remember, every expert welder started with their first machine and faced the same learning curve. Embracing the process with persistence ensures long-term success.
Budgeting wisely is important when buying your first welder. While it might be tempting to purchase the cheapest machine available, this often leads to disappointing performance and early replacement costs. Conversely, high-end industrial welders may have features you don’t yet need and carry a higher price tag. Setting a realistic budget involves balancing price with necessary features such as amperage range, duty cycle, and included accessories. Remember to allocate funds for consumables, safety gear, and workspace setup as part of the total cost. Researching brands and models, reading user reviews, and comparing warranties helps ensure you get good value. Many reputable entry-level welders are available in the $300 to $1,000 range, offering reliable performance for beginners. Planning your purchase carefully maximizes your investment and supports a positive welding experience.
When buying your first welder, understanding the different types of welding machines available helps you make an informed choice tailored to your needs. The three primary types of welding machines are transformer-based welders, inverter welders, and multi-process welders. Transformer welders use electromagnetic induction to convert electrical current and are known for their durability and simplicity but tend to be heavier and less energy efficient. Inverter welders use advanced electronics to convert power and offer lightweight, portable machines with precise control, making them ideal for beginners seeking versatility. Multi-process welders combine several welding methods like MIG, TIG, and stick in one unit, offering flexibility but sometimes at a higher cost and complexity. Evaluating the benefits and limitations of each type will guide you in selecting the right first welder for your skill level, project requirements, and budget.
Inverter welding technology has revolutionized the welding industry and is particularly beneficial for beginners. Unlike traditional transformer welders, inverter welders use electronic components to convert power, resulting in machines that are significantly lighter and more compact. This portability makes them easier to transport and store, especially for hobbyists or small shop owners. Inverter welders also provide better arc stability and precise control over amperage and voltage, allowing beginners to achieve cleaner, more consistent welds. Many inverter machines feature digital displays and adjustable settings that help users learn and refine their techniques. Additionally, inverter technology improves energy efficiency, reducing electricity consumption and operating costs. For someone buying their first welder, choosing an inverter model offers a blend of convenience, performance, and ease of use.
Regular maintenance is key to ensuring your first welder remains reliable and safe over time. Establishing a maintenance schedule helps prevent unexpected breakdowns and extends the life of your machine. After each use, inspect cables, connectors, and consumables for wear or damage, replacing any faulty parts immediately. Clean the machine’s exterior and ventilation areas to prevent dust buildup, which can cause overheating. For wire feed systems, regularly clean rollers and check for proper tension. Gas welders require monitoring gas flow and inspecting hoses and regulators for leaks. Periodically check all screws and fasteners to ensure the machine is structurally sound. Following manufacturer guidelines for annual servicing or professional calibration will keep your first welder operating at peak performance. A consistent maintenance routine not only safeguards your investment but also supports better weld quality.
For beginners, complementing your practical experience with formal training accelerates skill development and deepens your understanding of welding principles. Many vocational schools, community colleges, and technical institutes offer welding courses tailored to various skill levels. When selecting a welding school or training program, consider factors such as accreditation, curriculum focus (MIG, TIG, stick welding), instructor qualifications, and access to modern equipment. Hands-on training combined with classroom instruction on safety, metallurgy, and codes prepares you for both hobby and professional welding. Additionally, some programs offer certification preparation, such as AWS welding certification, which can enhance job prospects. Local apprenticeship opportunities can also provide valuable real-world experience. Investing time in quality training maximizes the potential of your first welder and sets the foundation for a successful welding career or hobby.
Deciding whether to purchase your first welder online or in a physical store involves weighing convenience, support, and the ability to inspect the machine firsthand. Buying online offers a broader selection, competitive pricing, and customer reviews that provide insight into performance and reliability. However, it requires careful research to ensure you buy from reputable sellers and understand the warranty and return policies. In-store purchases allow you to ask questions directly to knowledgeable staff, see the machine’s build quality, and sometimes receive hands-on demonstrations. Many stores also offer post-purchase support and immediate service if issues arise. For beginners, combining online research with in-store visits can provide the best of both worlds, ensuring you make a confident and informed choice for your first welder.
Buying your first welder marks the beginning of an exciting journey into the world of metal fabrication and repair. With the right knowledge and preparation, selecting the perfect machine can set the foundation for years of successful projects, skill development, and even professional opportunities. Understanding the different welding processes, power requirements, safety features, and machine types empowers you to make an informed decision that aligns with your goals and budget. Remember, the ideal first welder is not necessarily the most expensive or advanced model, but the one that best suits your current needs while allowing room to grow.
As a beginner, investing time in learning the fundamentals of welding techniques, metallurgy, and equipment maintenance will enhance your confidence and results. Equipping yourself with quality protective gear and establishing a safe, organized workspace ensures that your welding experience is both enjoyable and secure. Don’t hesitate to seek formal training or mentorship to accelerate your progress.
Ultimately, your first welder is more than just a tool; it is the gateway to a rewarding craft that combines creativity, precision, and problem-solving. Approach this purchase with careful research and thoughtful consideration, and you will be well on your way to mastering the art of welding. Whether you aspire to build, repair, or innovate, the right first welder will help you bring your metalworking visions to life.
The best type of welder for a first welder depends on your intended projects and skill level. MIG welders are often recommended for beginners due to their ease of use and versatility. Stick welders are durable and good for outdoor work, while TIG welders offer precision but require more skill. Many beginners find dual-voltage inverter MIG welders an ideal balance.
A reliable first welder typically costs between $300 and $1,000. Your budget should also include safety gear, consumables like electrodes or wire, and workspace setup. Investing in quality equipment within this range ensures better performance and durability.
Many beginner welders operate on 110/120 volts, compatible with standard household outlets. However, welders that require 220/240 volts can handle thicker materials but may need a dedicated circuit or outlet installed by an electrician.
Essential safety equipment includes an auto-darkening welding helmet, flame-resistant gloves and clothing, safety glasses, and proper footwear. Adequate ventilation and fire safety measures in your workspace are also crucial.
The duty cycle indicates how long you can weld continuously before the machine needs to cool down. Beginners working on small projects can manage with a lower duty cycle, but higher duty cycles improve productivity for larger or longer tasks.
While not mandatory, taking a welding class or receiving formal training is highly recommended. It accelerates skill development, teaches safety practices, and helps you avoid common beginner mistakes.
Yes, purchasing the appropriate consumables is essential. Using the correct electrode or wire type and size ensures good weld quality and machine compatibility.
If you plan to move your welder between job sites or workspaces, portability is important. Inverter welders are typically lightweight and easy to transport, making them ideal for beginners needing mobility.
Your first welder’s capability to weld various metals depends on its type and settings. Mild steel is the easiest to weld, while aluminum and stainless steel may require specific welders or techniques, such as TIG welding.
Regularly inspect and clean your machine, check cables and connections, replace worn consumables, and follow the manufacturer’s maintenance schedule. Proper care extends the lifespan and ensures safe operation.
Read More


At Best Welder Reviews, Hamim Minhas has years of welding experience and expertise in evaluating welding tools and accessories. My goal is to provide clear, reliable and deep insights to help welders of all levels make informed decisions. Whether you're a beginner or an expert, my thorough reviews, buying guides, and tips ensure you find the right tool for every welding project.


Copyright © 2025 Best Welder Review. All rights reserved.


